Specify custom behaviors and exceptions
The main, top-level settings in TypeIt4Me govern the standard behaviour of sets and snippets. They will be applied consistently, across the board – unless you specify otherwise. You can override some of them on a case-by-case basis if you want. This section will explain what you need to do if you want a specific set or snippet to be governed by its own, different rules. Let’s look at how to specify exceptions to the global, app-level settings.
Apply different “expand in” and “don’t expand in” rules to individual sets
In the App Rules section of the main (global) TypeIt4Me settings, you can choose which apps TypeIt4Me should or shouldn’t expand your abbreviations in. However, you can also apply rules at a more granular level, to individual sets of snippets. These will take priority and override the global setting in App Rules (if there is one).
Apply an “only expand in these apps” rule to an individual set
Imagine you have a set of snippets that contains only CSS and HTML markup. You only ever want snippets in that set to expand when you type the abbreviations in BBEdit, your favourite code editor. That’s easy to accomplish. Let’s look at how to specify an exception in TypeIt4Me and apply an “only expand in” rule to just one set.
- Open the main TypeIt4Me window
- Move the mouse / trackpad pointer over the set’s name in the sidebar
- Click on the action button that appears
- Select “Only Expand in…” from the menu that opens
- In the list of apps on the left of the popover that opens, click on the app you want the set to expand in
- Click the right-pointing arrow to move that app over to the “Only expand in these apps” column on the right
- Click OK
From now on, abbreviations in that set of snippets will only expand when typed in the app you specified. This behaviour will take priority over whatever you might specify in the “App Rules” section of TypeIt4Me’s global Settings.
If you later change your mind, it’s simple to undo this setting and revert to the default behaviour. Just repeat steps 1-3 above, then click on “Apply App Rules.”
Apply a “don’t expand in these apps” rule to an individual set
Suppose there’s a set of snippets that you never want to expand when you type the abbreviations in Adobe Photoshop. Perhaps because some of them would otherwise clash with keyboard shortcuts for accessing common Photoshop tools. It’s simple to tell TypeIt4Me to ignore that set when you’re working in Photoshop. Here’s how to specify an exception in TypeIt4Me and apply a “don’t expand in” rule to just one set.
- Open the main TypeIt4Me window
- Move the mouse / trackpad pointer over the set’s name in the sidebar
- Click on the action button that appears
- Select “Don’t Expand in…” from the menu that opens
- In the list of apps on the left of the popover that opens, click on the app you don’t want the set to expand in
- Click the right-pointing arrow to move that app over to the “Don’t expand in these apps” column on the right
- Click OK
From now on, abbreviations in that set of snippets will not expand when typed in the app you specified. This behaviour will take priority over whatever you might specify in the “App Rules” section of TypeIt4Me’s global Settings.
If you later change your mind, it’s simple to undo this setting and revert to the default behaviour. Just repeat steps 1-3 above, then click on “Apply App Rules.”
Apply different settings to individual snippets
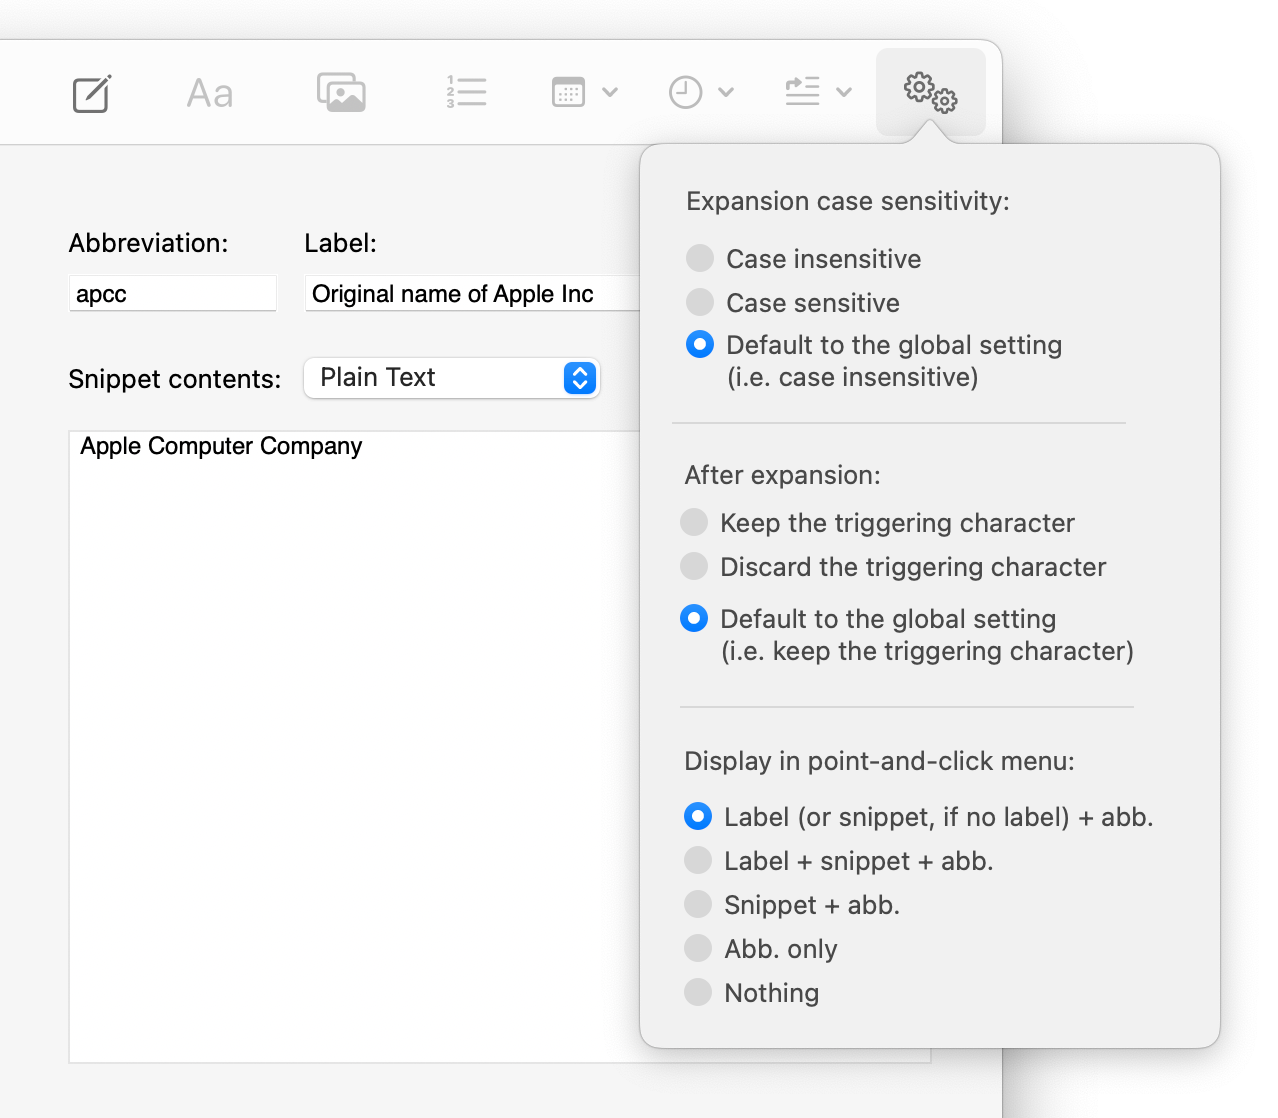
You’ll notice that when you select one or more snippets, a settings button in the top right corner of the TypeIt4Me toolbar becomes enabled. If you click on this settings button a menu will open in which you can apply settings to the selected snippet(s).
A couple of the options in the General and Expansion sections of TypeIt4Me’s settings can be overridden for individual snippets in this menu. Specifically, you can apply snippet-level behaviours for:
- Case sensitivity.
- Discarding or retaining the triggering character on expansion.
- Whether (or how) the selected snippet(s) should appear in the TypeIt4Me point-and-click snippet list(s) accessible via the menu bar.
Change case sensitivity for the selected snippet(s)
In the snippet settings menu you can set a different case sensitivity behaviour that will take priority over your global TypeIt4Me Expansion settings. Your options are:
- Case insensitive
The abbreviation for this snippet will always expand when typed, regardless of whether it is typed in uppercase, lowercase or a mixture thereof. - Case sensitive
The abbreviation must be typed in exactly the same case in which it was defined, otherwise the snippet will not expand. - Default to the global setting
The snippet will follow whatever you specify for the “Case sensitive expansion” option in TypeIt4Me’s top level Expansion settings.
Keep or discard triggers for the selected snippet(s)
The middle section of the snippet settings menu is where you can set a different behaviour for keeping or discarding the trigger. What you select here will take priority over your global TypeIt4Me Expansion settings. Your options are:
- Keep the triggering character
The space, period, comma or other trigger that you type to expand this abbreviation will always be retained at the end of your expanded snippet. - Discard the triggering character*
Any character you type to expand the abbreviation will be discarded after the full snippet appears. - Default to the global setting
The snippet will follow whatever you specify for the “Discard triggering character” option in TypeIt4Me’s top level Expansion settings.
Specify how the selected snippet(s) should appear in the point-and-click menu list
In the final section of the snippet settings menu you can tailor the way the selected snippet(s) will be displayed (if at all) in the point-and-click list accessed via the menu bar. The available display options you can choose from include:
- Abb. + label (or snippet if no label)
The abbreviation will appear in a right-aligned roundel. When a label has been defined it will appear left-aligned in the menu. If there is no label, a truncated preview of the snippet content will be shown instead. - Abb. + label + snippet
You’ll see the label (if there is one) followed by a truncated snippet content preview, with the abbreviation on the right. - Abb. + snippet
A truncated snippet content preview will be shown on the left and abbreviation will appear in a roundel on the right. - Abb. only
Just the abbreviation will be shown in the menu. - Nothing
The selected snippet(s) will not be visible in the point-and-click menu list at all.