TypeIt4Me Settings (Global)

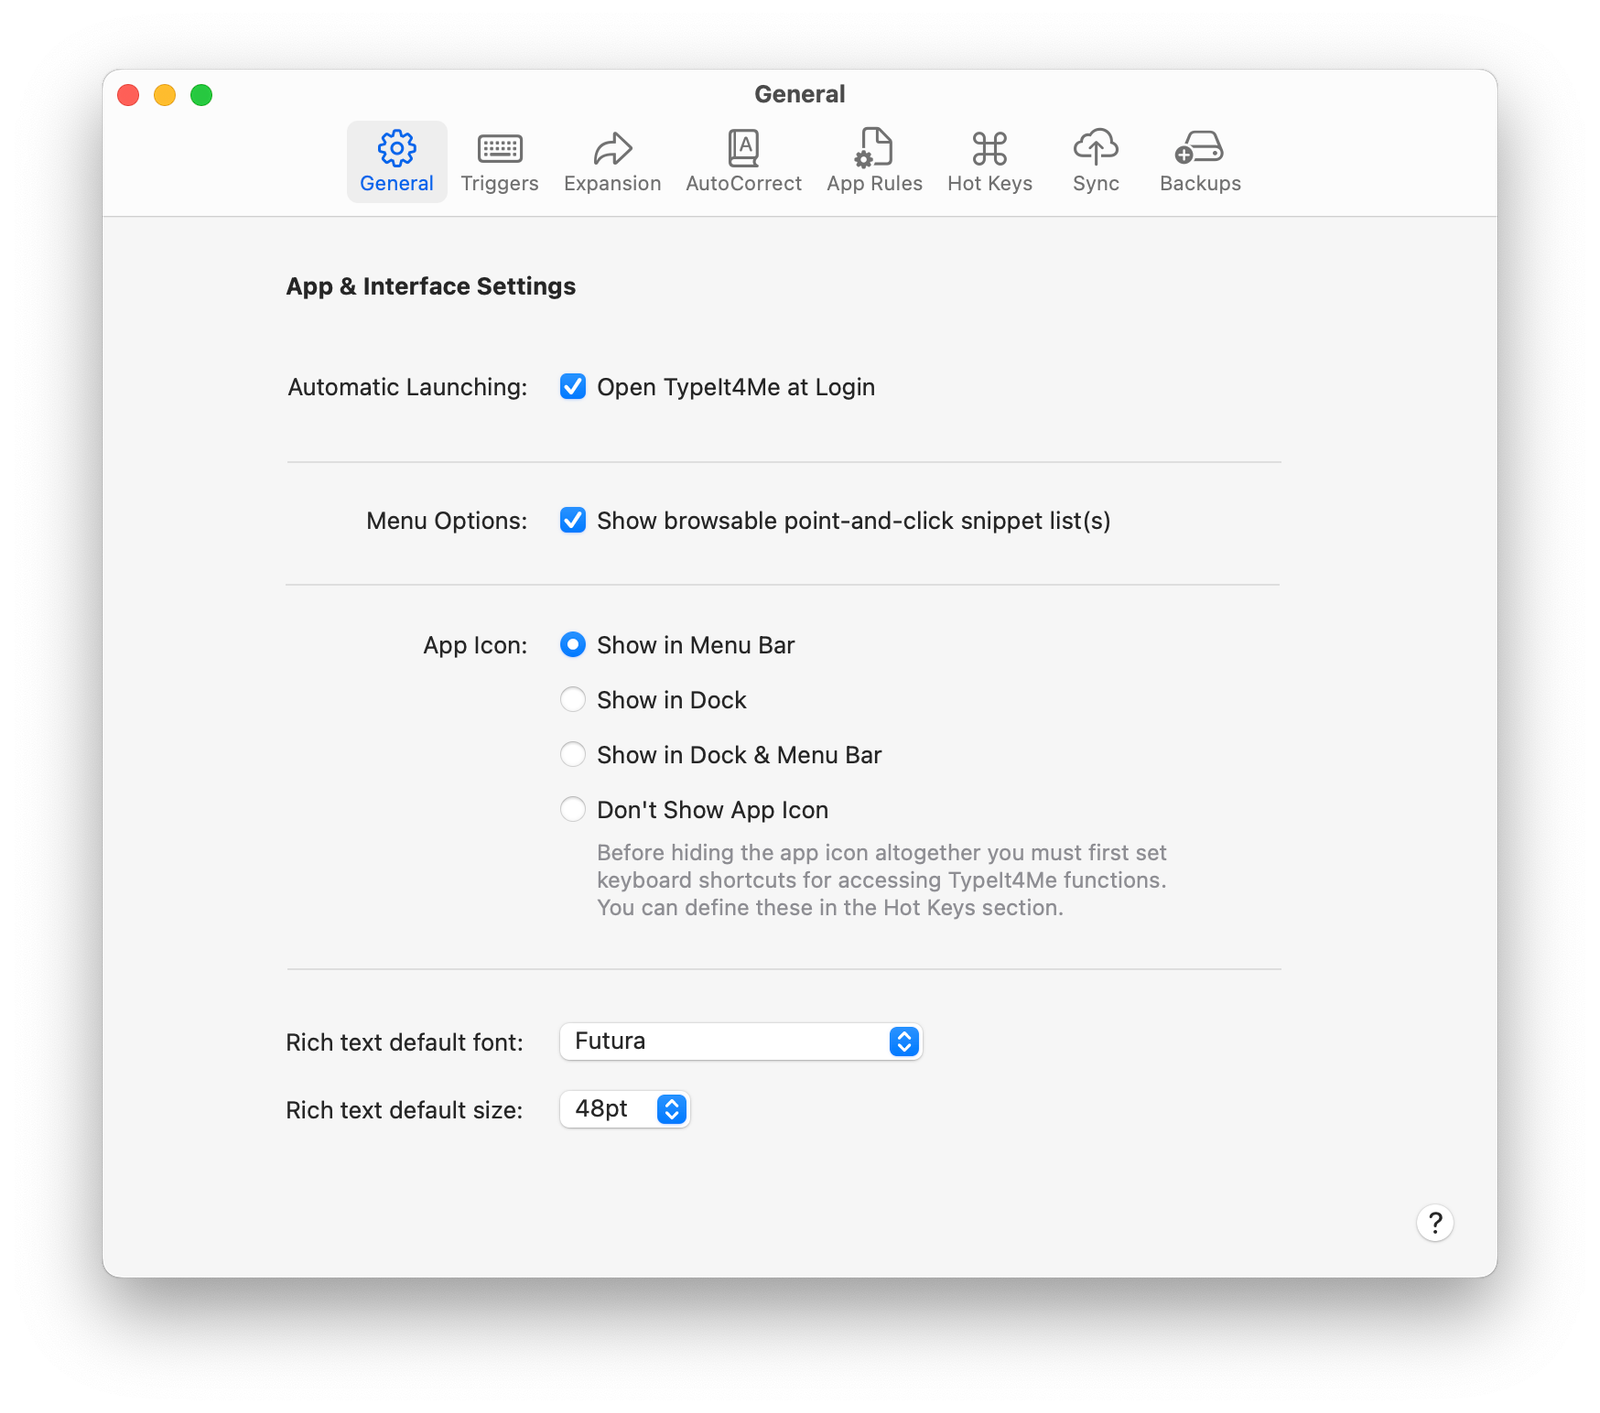
Many of TypeIt4Me’s features can be customised to suit your own personal requirements. The Settings window is where you’ll set everything up just the way you like it. In this section, we’ll explore the various options available to you.

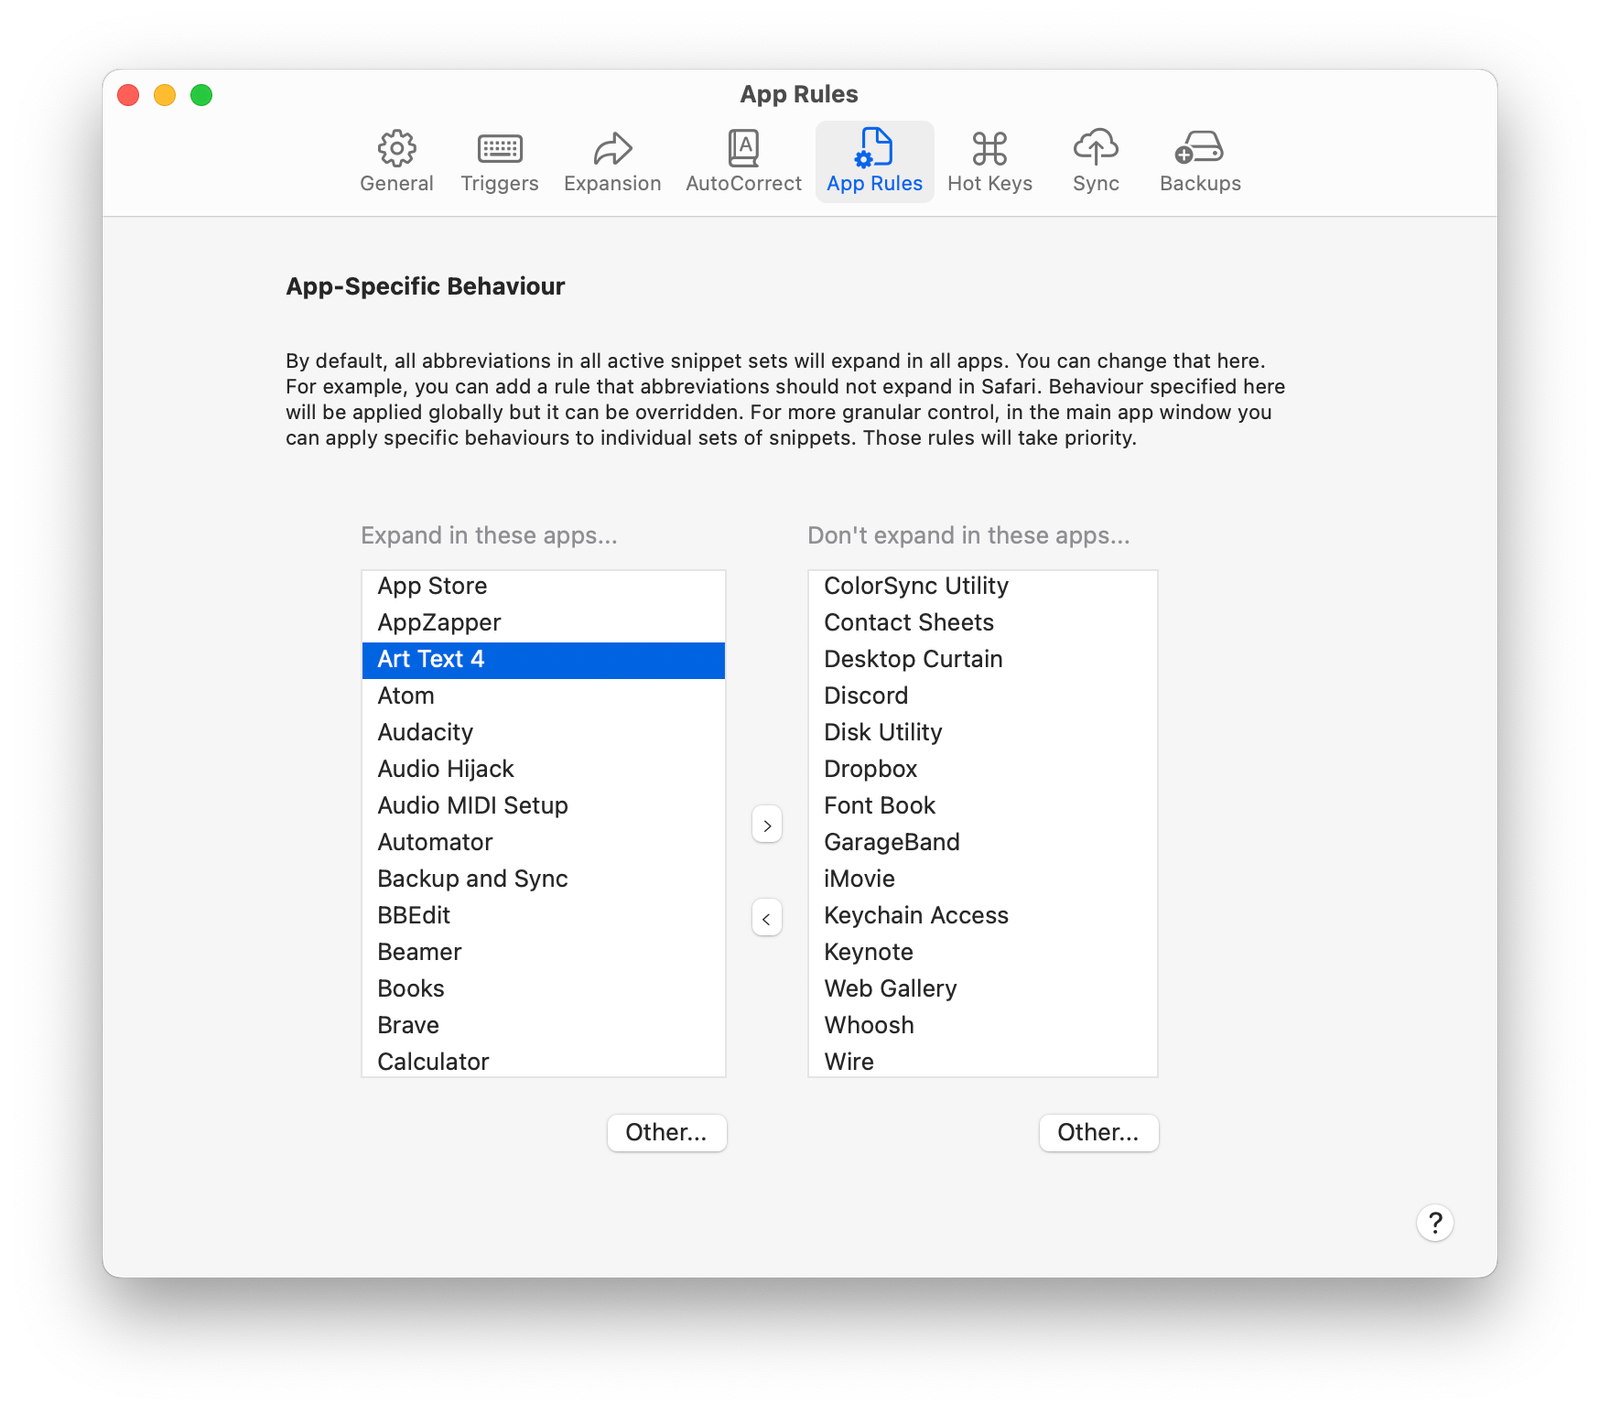
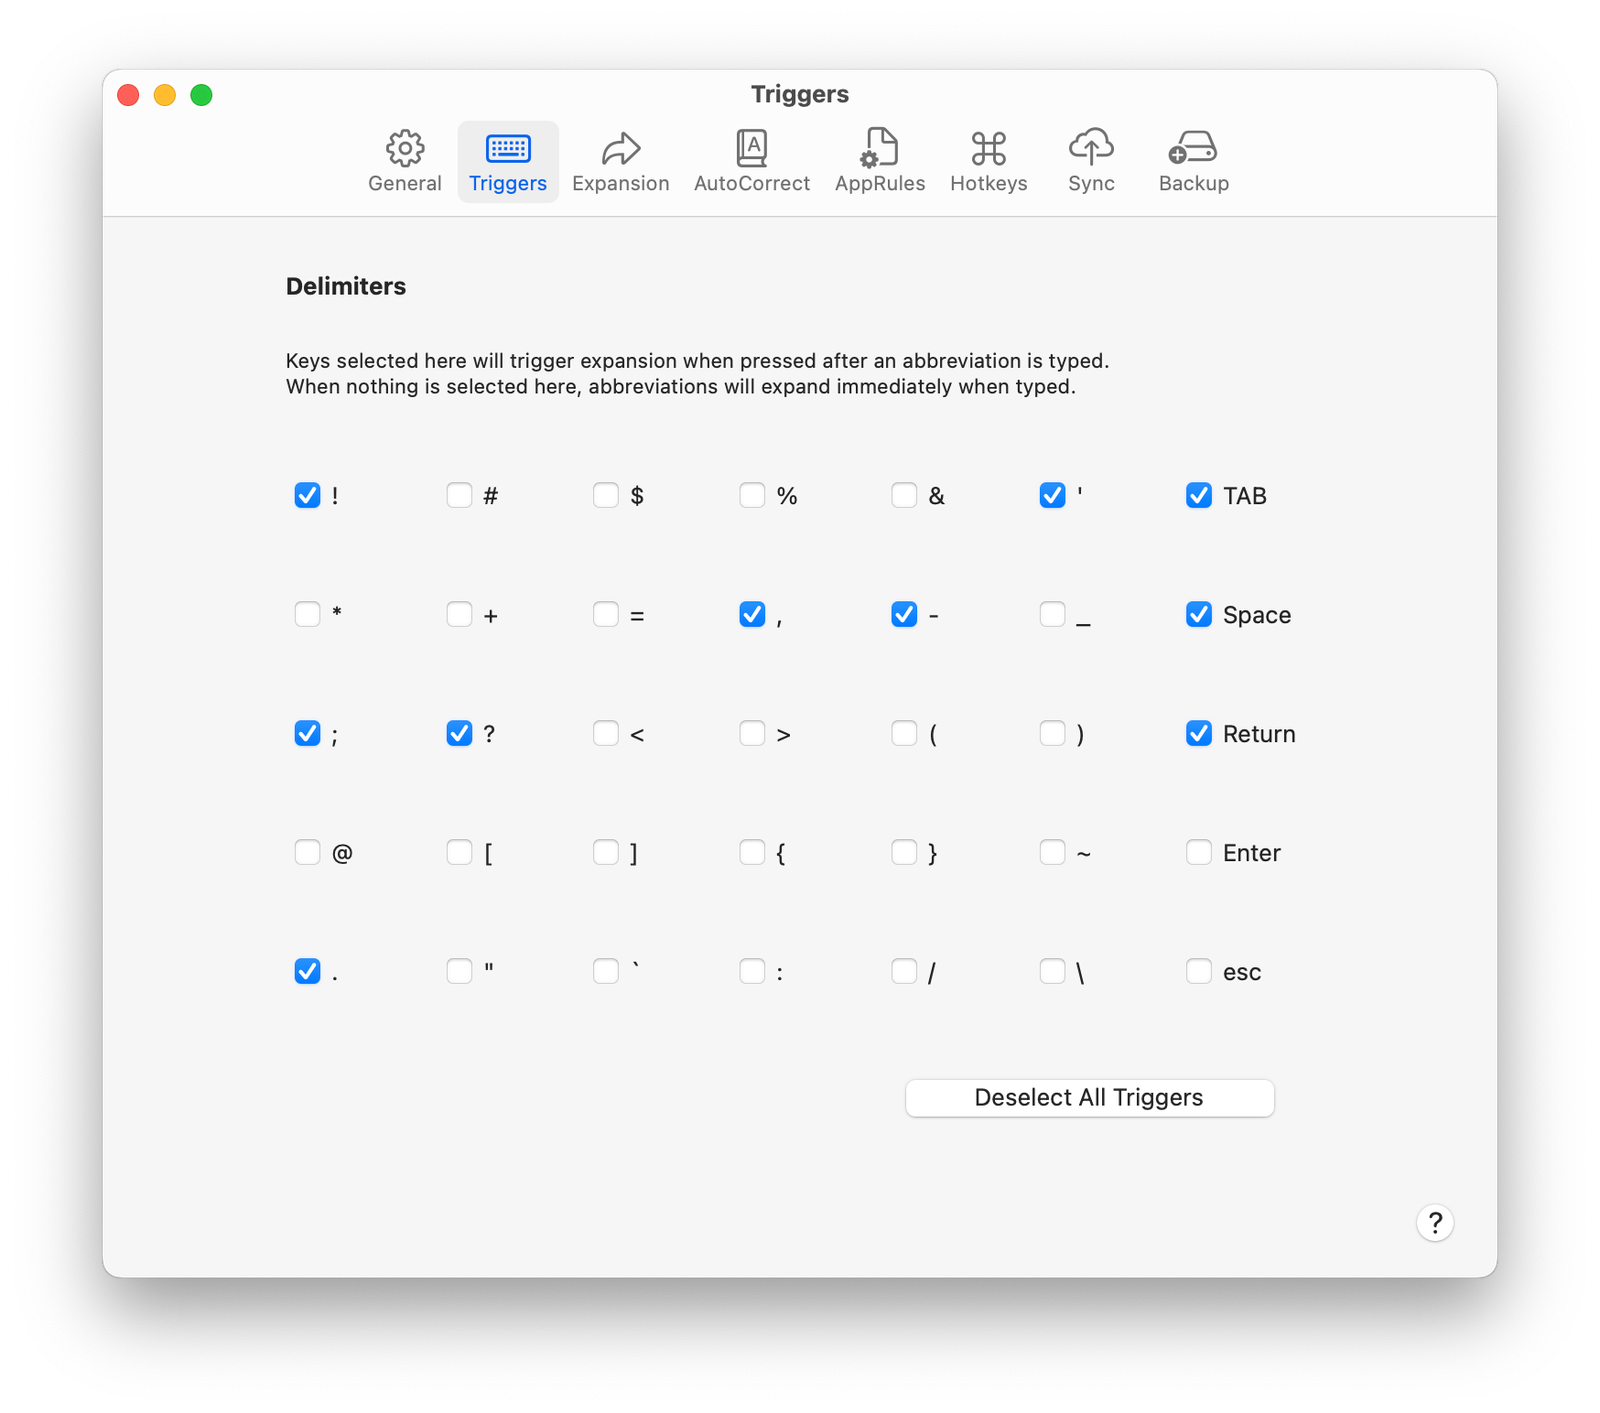
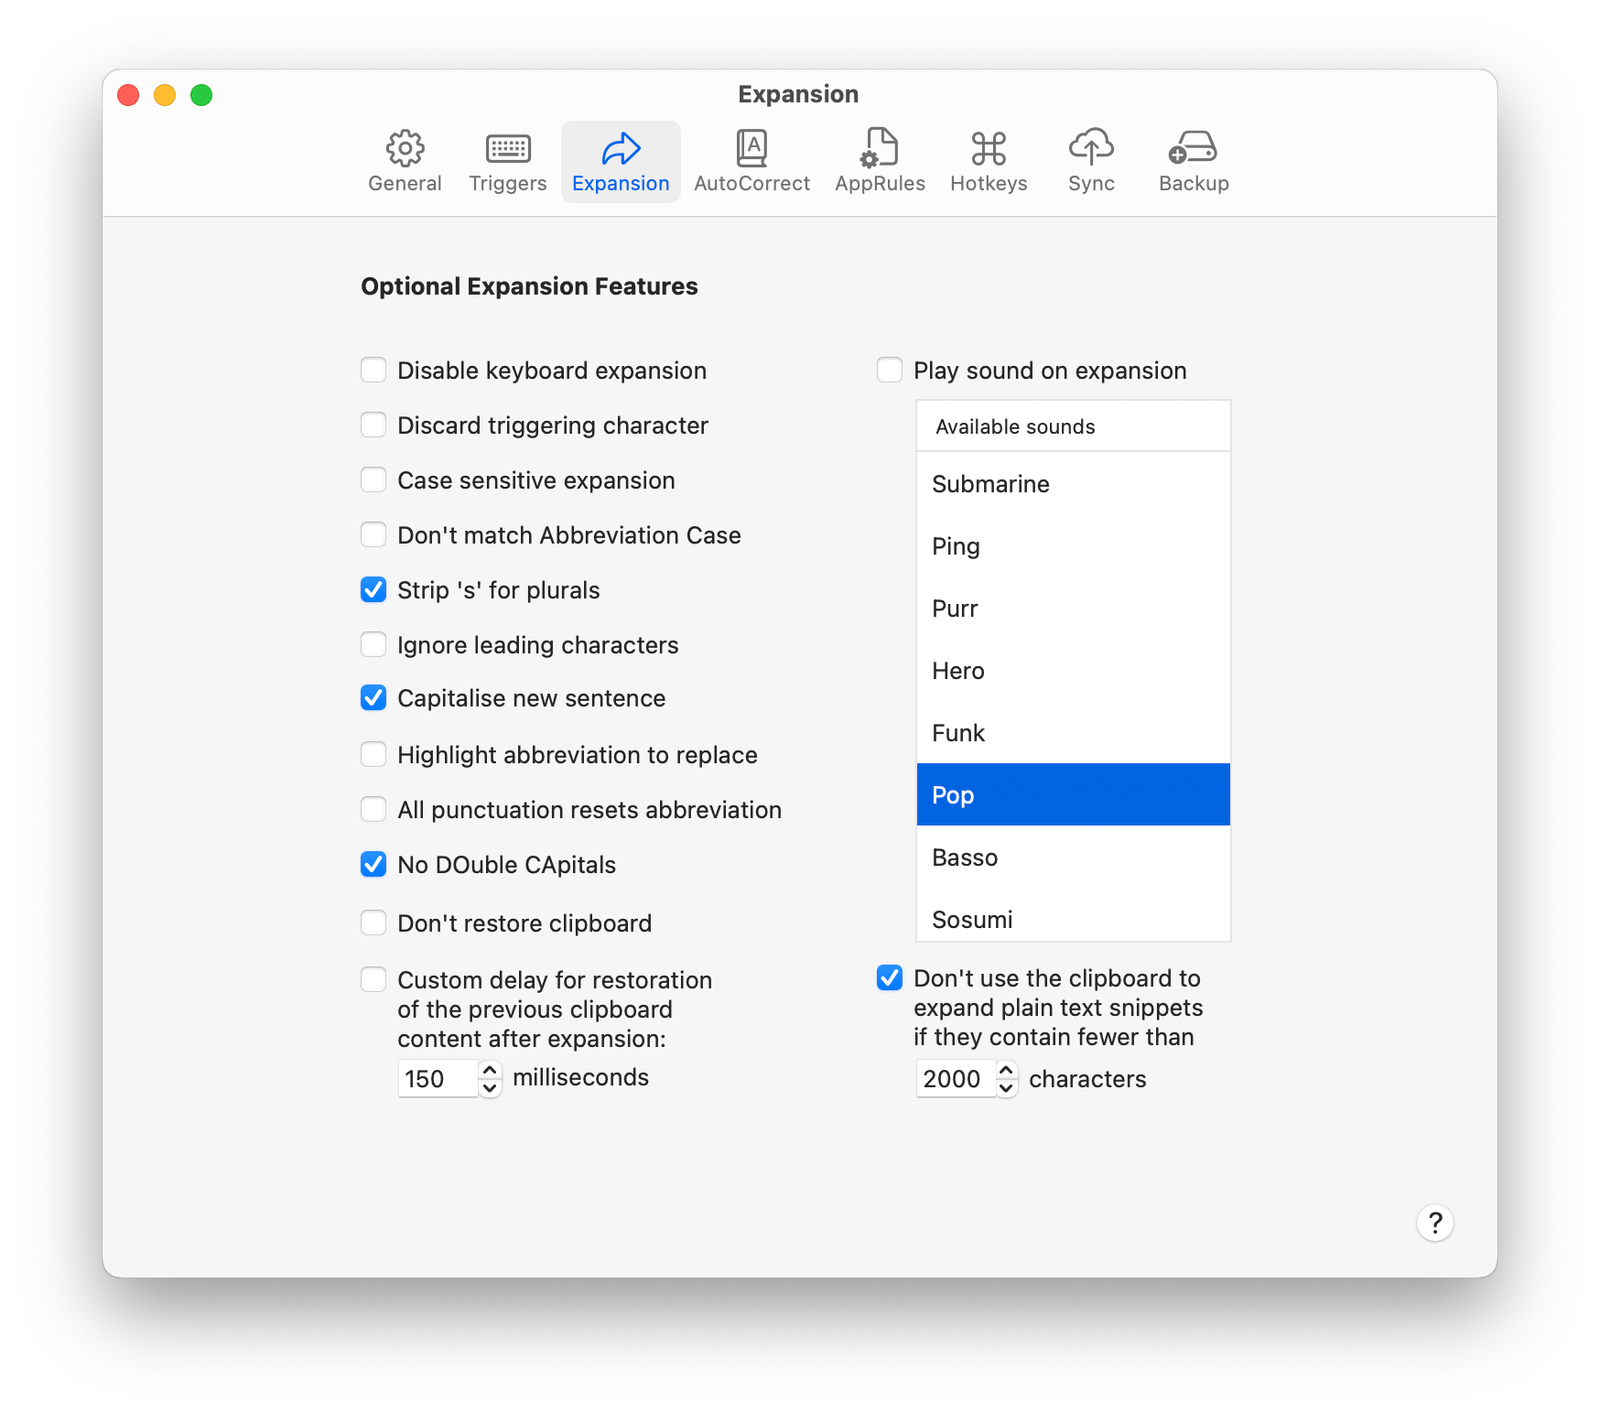
Don’t want spaces to trigger expansion? Looking to disable TypeIt4Me completely in certain apps? Perhaps you’d like to tweak spell-checking or have a sound play when abbreviations expand. It’s possible to do all that and a whole lot more.

The various groups of TypeIt4Me settings are organised under eight tabs:

A screenshot of the seven tabs at the top of the TypeIt4Me settings window

  • General
    (Basic app setup)
  • Triggers
    (Choose which – if any – delimiter keys should expand typed abbreviations when pressed)
  • Expansion
    (Fancy extra bells and whistles that include case sensitivity, capitalising sentences and playing a sound when abbreviations expand)
  • AutoCorrect
    (Enable and tweak TypeIt4Me’s built-in spell-check functionality)
  • App Rules
    (Tell TypeIt4Me which apps it should or shouldn’t work in)
  • Hot Keys
    (Set up handy keyboard shortcuts for accessing various TypeIt4Me functions and opening the main app window)
  • Sync
    (Enable the ability to save your snippets in iCloud so they can sync across all your computers)
  • Backups
    (Specify how frequently TypeIt4Me should make back-ups of your snippet data – if at all)

Next, we’ll give an overview of what you can do in each. If some of what follows sounds a little jargon-y, don’t worry too much about trying to understand and retain what everything does. As long as you get the gist of the kind of things TypeIt4Me can do, you can always refer back to this section later and experiment when there’s something specific you’re trying to achieve. Chances are, you’ll leave most of the default settings unchanged.

General

The first Settings tab – General – groups together an array of high level options. This is where you’ll set up some fundamental behaviours to suit your taste.

A screenshot of the General settings in TypeIt4Me

You can specify whether or not TypeIt4Me should:

  • Automatically open every time you log in to your Mac (we recommend leaving this option enabled).
  • Display your snippets in a browsable list accessed via the menu bar so you can pick snippets to insert manually from a menu, in addition to expanding typed abbreviations.
  • Display the app icon in the dock, in the menu bar, in both or hide it completely.
  • Use a different expansion method that doesn’t use the clipboard when expanding plain text snippets. By default, TypeIt4Me works by copying and pasting your snippets to and from the Clipboard on the fly. If you’re working in an environment that inhibits or interferes with pasted input and this appears to be causing problems with TypeIt4Me, tick the “Don’t use the Clipboard…” option here. It will bypass the clipboard and expand snippets another way.*

Finally, you can also choose a preferred font and size that TypeIt4Me should default to when you change a snippet from plain text to rich text.

*Note: this method only works for plain text snippets and because it’s slower, it’s limited to snippets up to a maximum of 2,000-characters in length. You can reduce the maximum if you find it too slow.

Triggers

Under the Triggers tab you’ll find a set of checkboxes you can use to choose one, several or even all of 35 characters on your keyboard that will act as triggers and cause your TypeIt4Me abbreviations to be expanded as you type. To add or remove a trigger, just tick or untick the checkbox next to it.

A screenshot of the Triggers settings in TypeIt4Me

Note: you can set triggers to be included at the end of expanded snippet content (“appended”) or discarded. There is a global setting for this (see the next section) but it can be overridden in individual snippets.

Expanding abbreviations without typing a trigger:

You don’t have to use a trigger key to expand your abbreviations if you don’t want to. To set abbreviations to expand immediately as soon as they are typed, i.e. without the need to type a trigger, deselect all the checkboxes.

Take care: if you deselect all triggers, you will need to ensure that no two abbreviations start with the same letters. Otherwise, the shorter one will trigger as soon as you type it, every time.

Expansion

To tinker with settings that govern how TypeIt4Me behaves when expanding your snippets, head to the Expansion tab. There are thirteen optional features that you can enable. You can hover your mouse / trackpad pointer over each checkbox to reveal a tooltip that summarises the feature. Alternatively, to get a more detailed explanation of what each one does, read on below.

A screenshot of the Expansion options in the TypeIt4Me settings window

Let’s examine each option in turn. We’ll detail exactly what each one does here.

  • Disable keyboard expansion

    To stop TypeIt4Me expanding your abbreviations automatically as you type, check this box. When this feature is turned on you’ll only be able to expand abbreviations using the point-and-click menu list.

  • Discard triggering character

    Turn this on if you don’t want the character that triggers expansion (e.g. a space) to be retained at the end of expanded snippets. This is a global setting that will apply to all snippets, but you can override it for individual snippets should you wish, by changing their individual settings. (Tip: There is also a neat trick you can use if – instead of using a permanent setting – you just want to discard the trigger on a case-by-case basis: hold down the function key on your keyboard at the same time as you press the trigger.)

  • Case sensitive expansion

    If you check this option your abbreviations will only expand when they are typed in exactly the same upper and / or lower case format in which they were defined. Note that TypeIt4Me will still alert you if you attempt to define two identical abbreviations, even if you type them in a different case. So, if “ty” already exists, TypeIt4Me will intervene to remind you if you later try to define a “TY” abbreviation.

  • Don’t match Abbreviation Case

    By default, if you type an abbreviation starting with a Capital letter or in ALL CAPS then TypeIt4Me will expand the snippet accordingly, so that it starts with a Capital letter or is typed in ALL CAPS. To stop that, tick the box for “Don’t match Abbreviation Case.”

  • Strip ’s’ for plurals

    The “strip ’s’ for plurals” setting enables you to define an abbreviation only once to cover both singular and plural forms. If you check this option, typing an abbreviation and adding an s to the end before triggering it will result in the expanded snippet also having an s at the end.

    Suppose you define abb as abbreviation. Without this option, you would also have to define abbs to produce abbreviations. Either that, or you would have to type abb, then a space to trigger the expansion to abbreviation, then a backspace and finally type an s at the end of abbreviation. Instead, if you choose to strip s for plurals, you’ll be able to type abbs and see it expand to abbreviations, without the need to define abbs separately.

  • Ignore leading characters

    If you want TypeIt4Me to expand a snippet even if its triggering abbreviation is immediately preceded by non-whitespace characters, tick the “Ignore leading characters” box. This feature was requested for a very specific use case. You probably won’t need it, it’s just there in case you find that you do.

  • Don’t restore clipboard

    One way that TypeIt4Me works is by placing the content of your snippet on the clipboard and then pasting it over the abbreviation you typed. Once it’s done that, it will put back whatever had previously been copied to the clipboard. That is, unless you select the “Don’t restore clipboard” option.

    When this feature is turned on, the content of the last expanded snippet will remain on the clipboard – so if you then press V the snippet will be pasted again. Some people use this feature to insert the same thing in a document multiple times in quick succession, because it’s faster than re-typing the abbreviation every time.

  • Highlight abbreviation to replace

    Tick this checkbox if when you undo ( Z) an expansion you’d prefer to see the abbreviation you typed come back, highlighted and ready to be replaced with something else.

  • All punctuation resets abbreviation

    Turn this on to instruct TypeIt4Me to expand abbreviations even when they are typed immediately after a punctuation mark.

  • No DOuble CApitals

    This feature prevents you from typing two or more consecutive letters in uppercase. If you turn this option on, you will have to press the capslock key to type OK, US, USA, NASA, etc. Backspacing over a letter that has been turned to lowercase will allow you to re-type it in uppercase.

  • Capitalise new sentence.

    Turning this on will automatically turn the first letter you type after pressing return to uppercase. Ditto for letters typed after a . ! or ? but only when they are followed by a space. Note: when typing the first letter in a new document, it will not be capitalised because TypeIt4Me can only do so after it “sees” you type punctuation. This isn’t a bug, it’s a normal feature constraint.

  • Play sound on expansion

    To hear a system alert sound every time you trigger an expansion, select this option. While the checkbox is ticked, the list of available sounds beneath it remains active for you to pick your preferred sound. Power users with lots of abbreviations may be driven crazy by constant beeping, but if you only use text expansion sparingly and tend to look at the keyboard rather than the screen while typing, it can be useful for alerting you to typos triggering unintentional expansion, for example.

Important note: some of the power features here may conflict with other settings and / or produce undesirable output in certain exceptional circumstances. The bottom line is: if they work for you, turn them on. If you are unhappy with their behaviour, just turn them off. They’re entirely optional.

AutoCorrect

TypeIt4Me is primarily concerned with expanding your custom defined abbreviations to longer snippets of content. Your abbreviations will of course not be dictionary words themselves, so it might not be the best idea for the app to second guess everything you ever type. That said, it does offer two flavours of AutoCorrect functionality, accessible under the fourth preferences tab.

A screenshot of the AutoCorrect section of the TypeIt4Me Settings window

Since these days macOS already does a pretty good job of spellchecking, both of TypeIt4Me’s AutoCorrect options are switched off by default. You can opt to enable just one or choose to have both active at the same time; they’re complementary to each other.

When AutoCorrect Is Activated

If you type something that’s not a dictionary word and it’s not a defined abbreviation in any of your active snippet sets, either, that’s when AutoCorrect kicks in. When both options are enabled, TypeIt4Me will first look up your typo in the TidBITS AutoCorrect Dictionary (a compendium of commonly misspelt words). If it doesn’t find it there, it will ask AppleSpell (the built-in macOS spell checker provided by Apple) to make a suggestion for correction.

Use Your Own AutoCorrect Set

You can create your own lists of words to auto-correct and save them as TypeIt4Me sets, just like you would any other. If you then reveal those .typeit4me snippet set files in Finder and place them in
~/Library/Application Support/TypeIt4Me/AutoCorrect/
they will be listed in the popup menu, allowing you to easily change from one to another. By default, the menu includes a public domain file generously made available by TidBITS.

AppleSpell

A screenshot of the AppleSpell settings in TypeIt4Me
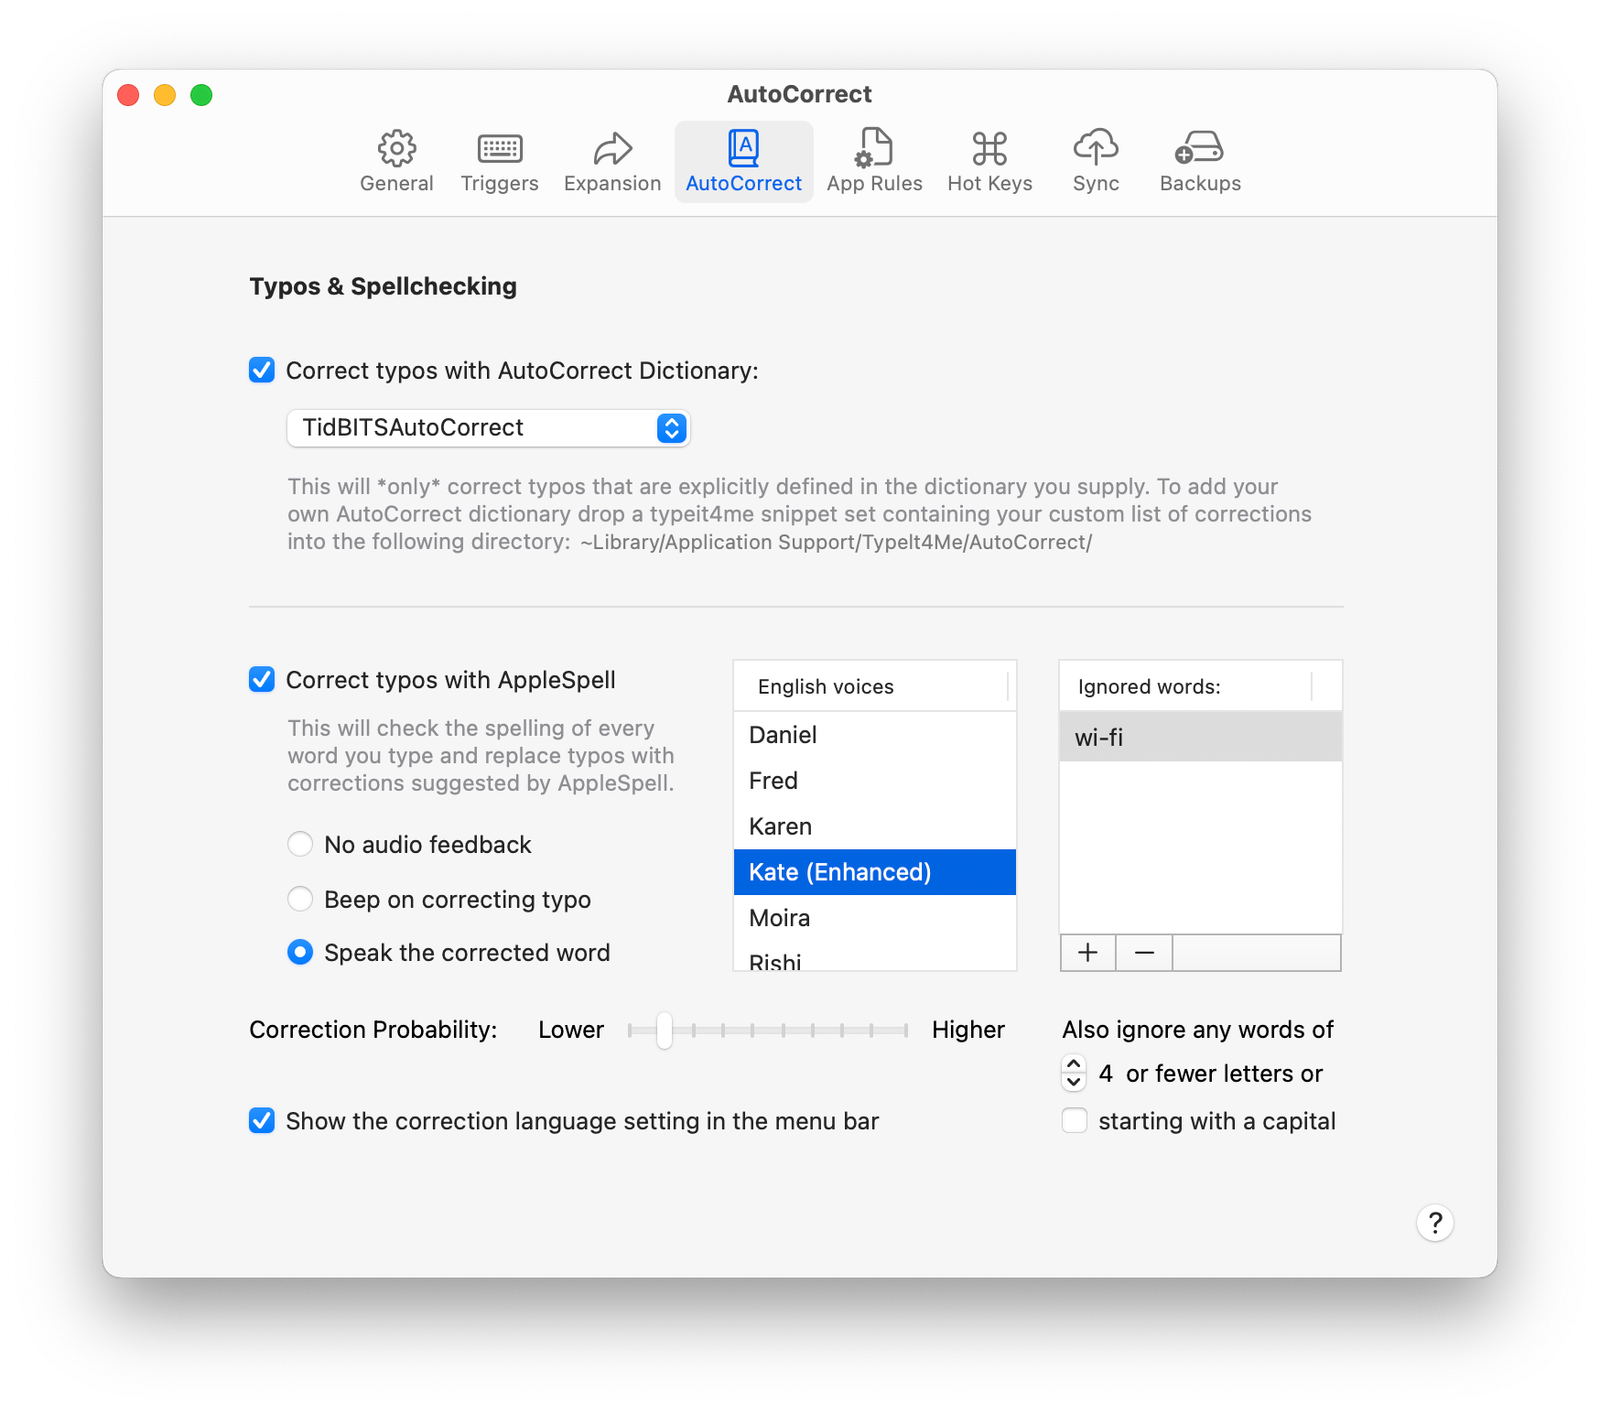
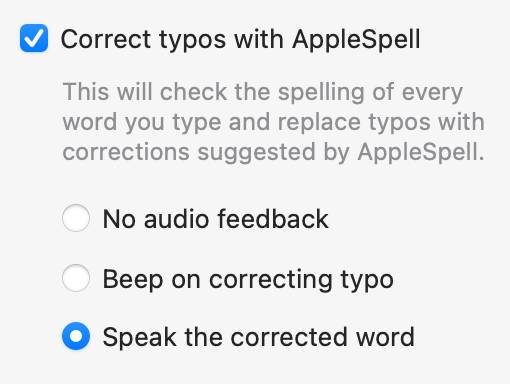
When you tick the Correct typos with AppleSpell checkbox, these three extra options will become selectable in the window:

  • No audio feedback
  • Beep on correcting a typo
  • Speak the corrected word.

We recommend you turn on audio feedback, preferably by having TypeIt4Me speak the suggested correction. On selecting either Beep… or Speak…, you will be presented with a choice of system alerts or system voices.

A screenshot of the correction probability slider in TypeIt4Me's AutoCorrect settings

You can use the slider to fine tune how different the suggested correct word can be in relation to your typo. Different users will be better served with different settings to match the kind of typos they’re prone to making. We recommend experimenting until you find the setting that suits you.

A screenshot of the ignored words list in TypeIt4Me AutoCorrect settings
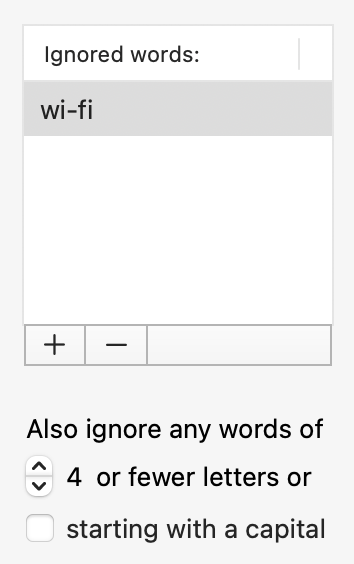
To tell TypeIt4Me to leave a specific word alone, add the word to the ignored words list. To add a word, click the + button and type the word. To remove a word from the list, select it by clicking on it, then click the – button.

…You may not want to keep opening up TypeIt4Me’s AutoCorrect preferences every time you need to add a word to ignore. Should that be the case, you can define a HotKey to use as a shortcut. The next time TypeIt4Me AutoCorrects a word that should have been left alone, press Z (undo) and while the word you want TypeIt4Me to ignore is highlighted, press the HotKey; the word will be added to the ignored words list.

Finally, you can also tell TypeIt4Me to ignore words that are shorter than a minimum length that you specify, or those that you type with a capital letter, such as proper nouns and acronyms.

Note that AutoCorrect may not suit everyone. It very much depends on the speed and style of typing of each individual. If you find it doesn’t suit your needs, even after tweaking all the settings, just turn it off. Also note that for AutoCorrect to work, you must select at least one trigger (space for example) in the Triggers preferences dialog tab.

AutoCorrect in multiple languages

If you assign a hot key for toggling AutoCorrect on and off and have also enabled more than one language in Language & Region System Preferences, TypeIt4Me will cycle through the top three languages in the list when you press the hot key.

A screenshot of the Autocorrect hot key in TypeIt4Me settings

A screenshot of macOS Language & Region system settings, showing the following selected languages: English, Italian, French, Spanish and German
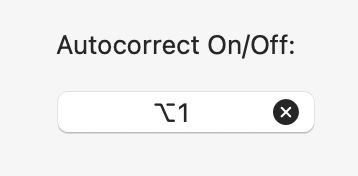
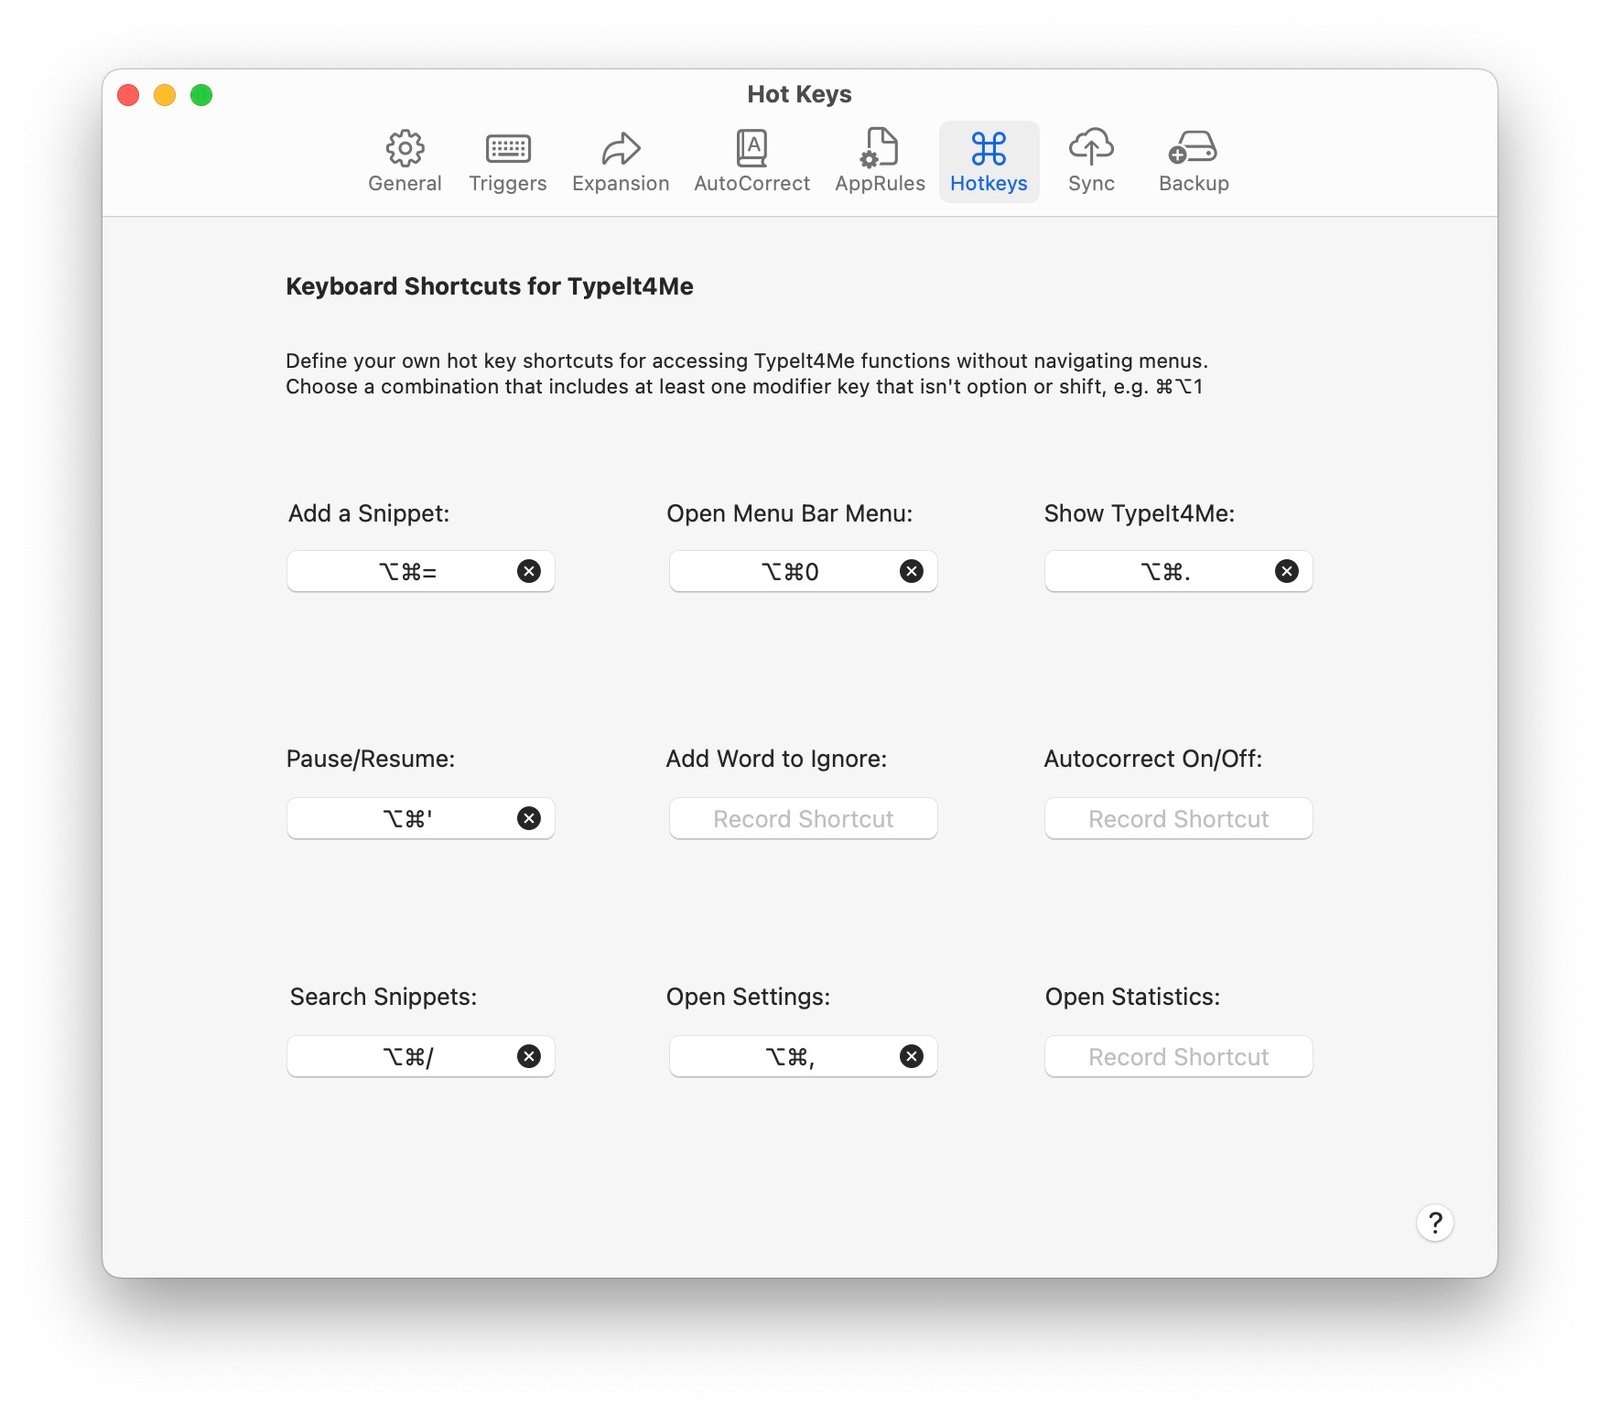
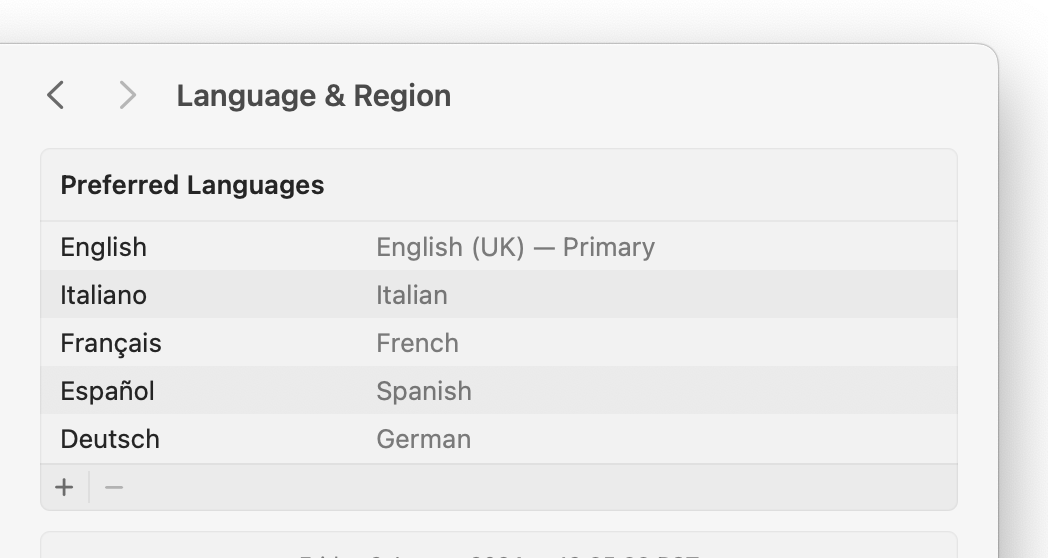
For example, if you set option-1 as the AutoCorrect hot key and your list of languages is like the one pictured here, pressing the hot key will switch from English to Italiano. Pressing it again will switch to Français. One more press on the hot key will turn AutoCorrect off. The next press on the hot key will bring back English, starting a new cycle. If you tick the “Show language settings in the menu bar” box in your AutoCorrect preferences, your current language setting will be displayed next to the TypeIt4Me icon, like so:

A screenshot of the TypeIt4Me AutoCorrect language setting displayed in the menu bar

Note that when you make changes to the Preferred Languages list in System Preferences, you will need to relaunch TypeIt4Me for the changes to take effect. The languages AppleSpell can check are: English, French, Italian, Spanish, German, Dutch, Swedish and Portuguese.

App Rules

By default, all abbreviations in all active sets will expand in all apps. However, you can instruct TypeIt4Me to make exceptions and specify in which apps it should or shouldn’t expand your abbreviations. Let’s look at how to do that.

A screenshot of the App Rules section of the TypeIt4Me settings window

Imagine you keep accidentally triggering snippet expansion while working in Adobe Photoshop, for example. They’re not needed there and they only get in your way. No problem: just do the following:

  1. Open TypeIt4Me’s settings and click on App Rules
  2. Locate and click on Adobe Photoshop in the list of apps on the left
  3. Click the right-pointing arrow button. Adobe Photoshop will be moved across to the “Don’t expand in these apps” column on the right.

That’s all there is to it. From now on, any TypeIt4Me abbreviations you type while working in Adobe Photoshop will not expand. If you later change your mind, just repeat the above process in reverse, clicking the left-pointing arrow button to move Adobe Photoshop back into the “Expand in these apps” column.

Hot Keys

Rather than constantly move your mouse or trackpad pointer to click on the TypeIt4Me menu, you may wish to use quick keyboard shortcuts to initiate certain TypeIt4Me actions.

A screenshot of the Hot Keys section in the TypeIt4Me Settings window

To set these up, head to the sixth Settings tab, Hot Keys. Here you can define up to nine “hot” keys that when pressed will invoke the following menu options:

  • Add a Snippet
    This opens a mini window in which you can define and save a new TypeIt4Me snippet.
  • Open Menu Bar Menu
    Pressing this does the same thing as clicking on the TypeIt4Me icon in the menu bar to open its menu. You can then use the arrow keys on your keyboard to navigate the menu and press return to select items.
  • Show TypeIt4Me
    This opens the main TypeIt4Me app window or brings it to the front if it’s already open.
  • Pause/Resume expansion
    A single hot key acts as a toggle for pausing and resuming TypeIt4Me expansion.
  • Add a word to the ignored words list
    (Not currently working in beta)
  • AutoCorrect on/off
    Again, a single hot key acts as a toggle for turning AutoCorrect on or off*.
  • Search Snippets
    This will open a floating window where you can search your snippets and select one to insert from the results.
  • Open Settings
    Summon up the TypeIt4Me Settings window.
  • Open Statistics
    Bring up a floating window with statistics relating to how fast you type and how much time TypeIt4Me has saved you since you started using it.

*Note that if you have more than one language active in the Preferred Languages section of your Mac’s Language & Region system settings, the Autocorrect On/Off hot key will actually cycle through the top three listed languages in sequence before reaching the off state.

Sync

The seventh Settings tab is where you can enable or disable the option to sync your TypeIt4Me snippets across multiple Macs. When the iCloud radio button is selected, you can both save new sets directly to iCloud and drag existing sets into the “Sets in iCloud” section of the TypeIt4Me sidebar. They can then be shared with any other Macs on which you have installed TypeIt4Me, as well as the TypeIt4Me Touch notepad app (available separately) for iOS and iPadOS.

A screenshot of the Sync section of the TypeIt4Me Settings window

Backups

Unless you tell it not to, TypeIt4Me will regularly save backup copies of your snippet sets to a local archive folder inside the app’s container on your Mac. This is in case you accidentally delete a set or make changes that you want to reverse and you don’t have a Time Machine backup that you can restore.

A screenshot of the Backups section of the TypeIt4Me Settings window